DIY Wine Cork Stamps from Upcycled Wine Corks
Celebrating the holiday season with some delicious wines or maybe a sparkling Moscato? Don’t toss those corks! You can use them to carve your own super cute DIY wine cork stamps that you can use to dress up your holiday gift tags!

Unfortunately, I am completely out of cyan and magenta toner for my color laser printer. As the regular yield toner for these run about $115 each, I’m holding off a bit on replacing them. Which of course leaves me with only black ink. If your printer only prints black or you’re just trying to conserve on color ink but really want to take advantage of all of those wonderful free printable gift tags for the holiday season, don’t despair! Simply carve your own DIY wine cork stamps to add your own dash of color and to customize black and white gift tags!

DIY Wine Cork Stamps
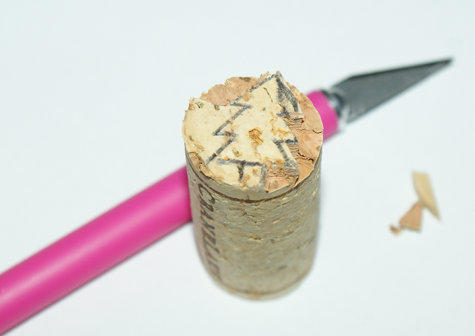
To make your own DIY wine cork stamps, you’ll need to start by gathering your supplies. You will need an exacto knife, a pen or marker to draw your stamp design, and of course some wine corks. I used both natural corks and synthetic corks for this project.

Simply draw a simple design on the flattest side of each cork you plan to use then cut out the design very carefully using an exacto knife. The synthetic corks seemed to be the easiest to carve. Once your design has been carved simply press your stamp into an ink pad, then press onto the paper or fabric of your choice. I discovered that the natural corks will stamp with an interesting texture which I found perfect for my Christmas Tree Stamps! The synthetic corks will also make a smoother stamp impression. Be sure to press down firmly with the stamp when using and lightly rock back and forth for the best results.

Here are just a few of the handmade stamps I carved – a star, a starburst/snowflake, a duck, a Christmas tree, an arrow and a heart. If you are nervous about using a blade to make your stamps or if you want to do this project with younger children, then you can instead buy small wooden shapes from the craft store and glue them onto the ends of your corks.

I used the free printable Christmas gift tags from Jones Design Company for this project. You can download these printable holiday gift tags here. I think these looked great printed out in black and white.

Once you print out the gift tags, simply stamp them with your desired stamps in you choice of ink colors and patterns. I printed my gift tags out onto white full sheet sticker labels, although you could also print them onto card stock.

Finally I applied my labels to my packages by punching two holes on either side of the top of the tag. I then removed the backing from the sticker and thread a piece of ribbon through the holes in the tag and placed it firmly onto the top of the package. Finally I simply tied the two ends of the ribbon into a bow!
For more free printable holiday gift tags, be sure to visit my Printables board on Pinterest. And for awesome diy handmade gifts to wrap and tag with your lovely new gift tags, be sure to visit my gift guides!


7 Comments
Makeiteasycrafts.blogspot.com
December 6, 2012 at 3:22 am
What a fantastic idea! 🙂
redcrowgreencrow
December 10, 2012 at 12:48 am
What a cool idea! I would love if you would link up to Fall Into the Holidays, open Saturday through Thursday-
http://redcrowgreencrow.wordpress.com/tag/fall-into-the-holidays/
Katie @ Horrific Knits
Reduce, Reuse, Renewed
December 11, 2012 at 4:13 pm
I have a handful of wine corks stashed away from a rainy day. Now I know what to do with them. Thanks for posting this!
Christine
December 11, 2012 at 9:38 pm
CONGRATS!!
You have been featured at The DIY Dreamer… From Dream To Reality! Come on over and grab your featured button.. you deserve it 🙂
http://thediydreamer.com/from-dream-to-reality/from-dream-to-reality-linky-party-46/
Megan
December 17, 2012 at 2:04 pm
Cute! You must be much better with an exacto knife than I am, because I had trouble even cutting just a triangle and rectangle, let alone an entire tree! 😀
Nicole Ringgold
December 27, 2012 at 10:40 pm
Terrific! Thank you for leaving the link to this post on my blog. I appreciate seeing alternatives!
Gartempe Sedelle
January 15, 2014 at 1:48 pm
Merci beaucoup pour cette astuce qui va bien me servir pour mes appliqués.
Cordialement 🙂
Comments are closed.