DIY Penguin Christmas Ornaments

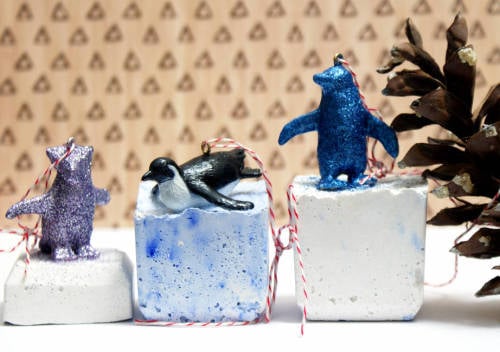
These cute DIY penguin Christmas ornaments are lots of fun to make. They can easily be crafted over a weekend and the entire family can join in on the fun! Keep reading to learn how to make these little ornaments that feature penguins sitting on their own little icebergs.

DIY Penguin Christmas Ornaments
What you’ll need:
Tovolo King Silicone Ice Cube Tray
plastic toy penguins
Clover Straight Tailors Awl
Woodland Scenics Scene-A-Rama Casting Plaster
Martha Stewart Crafts Fine Glitter
Original Gloss Mod Podge
baker’s twine
E6000 Glue/Craft Adhesive
Clear Spray Acrylic Sealer (matte or gloss)
glitter snow
small eye screws
foam brush
What you do:

Begin by using the tailor’s awl to pierce a starter hole in the head of each penguin you’d like to make an ornament with. Then screw an eye hook into each hole.

Now using a small foam brush coat the penguins you’d like to have glittered with Mod Podge. Hold on to the eye screw so you are able to coat the entire penguin except for the bottoms of this feet. Sprinkle the penguin with glitter until he is fully coated. Set aside to dry. Repeat for each penguin.

While the penguins are drying you can make their icebergs. You will use the casting plaster for this step. Start with six tablespoons of plaster in a glass bowl. Add two tablespoons of water and whisk with a fork to mix well. (For blue icebergs try adding a pinch of blue ultramarine pigment powder!) Now sprinkle glitter snow into a cavity of the ice cube mold then follow with the plaster. Press the plaster down into the mold firmly. Six tablespoons of the plaster will fill one ice cube cavity. Or use it to fill two cavities half way. Repeat until you have an iceberg for each penguin. Allow to set up for at least 40 minutes.
While the plaster is hardening go back over your glittered penguins with another layer of Mod Podge to keep the glitter from flaking off. You may add more glitter to any spots you missed at this time. Allow to dry.

After your plaster cubes have set up or at least 40 minutes have passed gently unmold them. Now use the E6000 to glue the penguins onto the tops of each of your plaster cubes.

Allow the glue to dry overnight. This will also allow the plaster to finish curing. The next day you will then seal your DIY penguin Christmas ornaments with a clear acrylic sealer. Apply two coats to all sides allowing each coat to dry fully.

Now add baker’s twine to each of your penguin Christmas ornaments by looping it through the eye screw and tying into a knot or bow.

And you’re done! All that’s left now is to hang your new DIY penguin Christmas ornaments onto your tree!
For more DIY Christmas ornament ideas and tutorials check out my For the Tree Pinterest board. Follow all of my Pinterest boards for homemade Christmas gift ideas, dessert recipes, holiday DIY’s, homemade soap recipe, beauty DIY’s and more. You can also follow me on Blog Lovin’, Tumblr, Facebook, Twitter and Instagram.


2 Comments
Vanessa
December 4, 2014 at 11:32 am
I love this and cute for a child’s Christmas tree
Cassie from The Thrifty Couple
December 4, 2014 at 12:42 pm
Cute re-do! I have never thought about this! You can do this with many animals. Fun!
Comments are closed.