
Skin Loving Natural Homemade Cold Process Soap Recipe for Dry Skin

This skin loving natural homemade cold process soap recipe for dry skin makes a thoughtful homemade Mother’s Day gift or homemade Valentine’s Day gift. You’ll need to make it at least 3-4 weeks of the intended holiday however as cold process soaps take a minimum of three weeks to cure. You can also cut your homemade soap loaves into smaller guest sized soap bars, stamp with hearts and use as lovely DIY wedding favors as well.
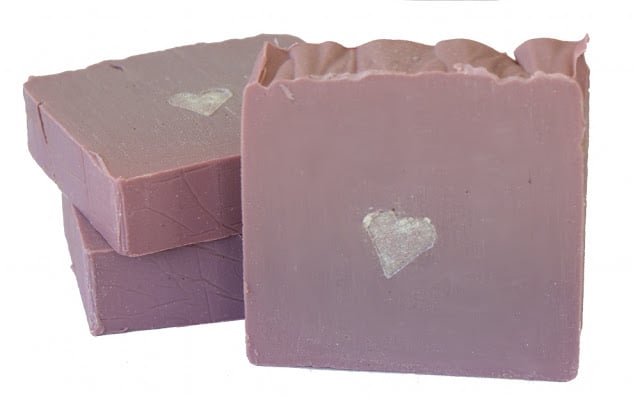
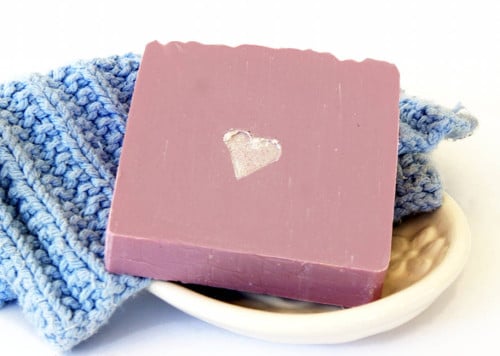
I made the homemade cold process soap recipe pictured above with the following recipe and a Pink Berry Mimosa fragrance oil. However, you can use any skin safe fragrance oil or natural essential oils (for an all natural soap) that you like. If you’ve never made homemade soaps before, you may want to start with a simpler recipe that uses less expensive soapmaking oils until you get the hang of it. You can learn how to make homemade cold process soaps through my soapmaking tutorial and easy homemade soap recipe found here.
Skin Loving Homemade Cold Process Soap Recipe for Dry Skin
Ingredients:
4.9 oz. cocoa butter
4.9 oz. shea butter
9.6 oz. palm (fruit) oil
14.7 oz. 76° melt point refined coconut oil
20.2 oz. soybean oil
9.6 oz. avocado oil
4.9 oz. hemp seed oil
9.6 oz. sweet almond oil
14.7 oz. olive oil (pomace is fine)
4.9 oz. grapeseed oil
32 fluid oz. distilled water (I discounted my water and used 28 oz.)
12.9 oz. lye (100% sodium hydroxide)
4 oz. fragrance oil (or 2 oz. essential oil) of choice
soapmaking colorants of choice
Instructions:
Practice soapmaking safety and wear rubber gloves and goggles. Have vinegar on hand to neutralize any lye that may spill on surfaces. However use water to flush lye that may land on skin. You’ll also need a digital kitchen scale to weigh out your ingredients and a stick blender to mix the soap.
Start by measuring out your distilled water in a pitcher. I discounted my water to 28 oz. and it turned out great. It was still soft enough to cut but just hard enough that you won’t spend 6 weeks waiting for the excess water to evaporate. If you are using a fragrance oil or essential oil known to accelerate trace, you can either use the full 32 oz. of water or allow your oil and water temps to cool to 98°F so it doesn’t seize up on you.
Now weigh out your lye and slowly pour it into the water in a well ventilated area with an exhaust fan or outside. Stir and set aside where it won’t get knocked over.
Now weigh out your butters and oils into a large non-aluminum pot. I start with the solids, then add the liquid oils, but it doesn’t really matter. Once you’ve weighed out and added all of the butters and oils to your pot, place on the stove top and heat over medium heat until thoroughly melted. Turn off heat and set aside to cool.
Once your lye-water and oils have cooled to about 100°F – this can take anywhere from 1-2 hours depending on the temperature in your home – you’re ready to mix the two together. While you’re waiting you can prepare your molds. I lined two large loaf soap molds for this recipe which will yield approximately twenty-four 5.5 oz. – 6 oz. bars once cured. Keep in mind that if you decided to half this recipe, you MUST run the oil amounts back through a lye calculator.
Now that the ingredients have cooled, slowly pour the lye-water into the oil and mix with a stick blender. Just before trace, I added color to my batch of soap. However, colorants are optional. As this soap uses some dark colored oils – avocado and hemp – and I did not want a dark bar of soap, I used several teaspoons titanium dioxide![]() to lighten the batch and then added some matte orchid ultramarine pigment powder until I achieved the color I was looking for. You can also use skin safe micas or other cold process approved soap dyes based on your own personal taste.
to lighten the batch and then added some matte orchid ultramarine pigment powder until I achieved the color I was looking for. You can also use skin safe micas or other cold process approved soap dyes based on your own personal taste.
Continue mixing to incorporate the color, then once your soap reaches a light trace, mix in the fragrance oil or essential oils that you have chosen. Once thoroughly mixed, pour your soap into the molds. Then cover the molds and insulate – I use bath towels – for twenty-four hours. After the allotted amount of time has passed, you can unmold your homemade soaps and immediately cut them into bars. Then set them aside to cure for a minimum of three weeks before use.
If you want to stamp your soaps, you need to do this as soon as you cut them into bars while the soap is still soft. I used a handmade stamp and diamond dust mica to stamp my soaps with hearts. You can find the tutorial for making your own hand stamped soaps here.
Once the soaps have cured, simply package, label (printable soap labels here) and gift.
Note that hemp seed oil and avocado oil have a shorter shelf life than most other oils, so don’t buy more than you plan to use. You can refrigerate these after opening to extend the shelf life up to six months. However, keep in mind that avocado oil will solidify in the refrigerator, so you’ll need to allow time for it to liquify again before use.
Want to add botanicals or clay to your soap? You can do so at trace. Natural ingredients like red rhassoul clay, lavender blossoms or sea salt would be a wonderful touch. What are some of your favorite ingredients you enjoy in handmade soaps?
For more homemade cold process soap recipes be sure to follow my boards on Pinterest!


8 Comments
Amy
January 12, 2014 at 9:28 am
I was wondering what do you package your homemade soaps in? Didn’t know if you could help?
Rebecca D. Dillon
January 12, 2014 at 11:24 am
I use professional plastic food wrap film like they use in restaurants. It holds really tight and it’s what I’ve used for many many years with no issues. I know they sell it at places like Sam’s Club. You could also use fabric or paper.
lisa helmick
February 23, 2014 at 2:38 am
How do you store the soap once cured. And if hemp and avocado oil are not used what is the shelf life. Have dry sensitive skin need some homemade soaps. Thank You.
Rebecca D. Dillon
February 23, 2014 at 2:13 pm
Just store them in a cool dry location. The hemp and avocado oils don’t really affect the shelf life because of the saponification process. I still have some of these I made and they’re still perfect. 🙂
Mallory
April 28, 2014 at 7:00 pm
Where do you go all the different ingredients? I am interested in this since I have a lot skin problems. But I don’t know where to begin. Thank you in advance!
Rebecca D. Dillon
April 28, 2014 at 7:49 pm
If you’re looking for organic ingredients I recommend Mountain Rose Herbs. They have some superior products and don’t require a minimum order. There are other soap suppliers listed on my tutorial on how to make cold process soap, however some do have a minimum order requirements generally between $40-$100.
Sheila
May 23, 2014 at 2:43 pm
Where did you buy the bags you have the soap in?
Rebecca D. Dillon
May 23, 2014 at 2:48 pm
I got these on Amazon. I think CuteTape.com carries them too.
Comments are closed.