

DIY Soap Cutter – A Simple Guide for Cutting Your Soap into Bars
If you’re looking for a way to consistently cut your homemade soap loaves into bars so that they the same size every time, then you need a soap cutter! There’s no need to purchase expensive equipment to do this, especially if you’re just starting out. Instead, craft your own handmade diy soap cutter.
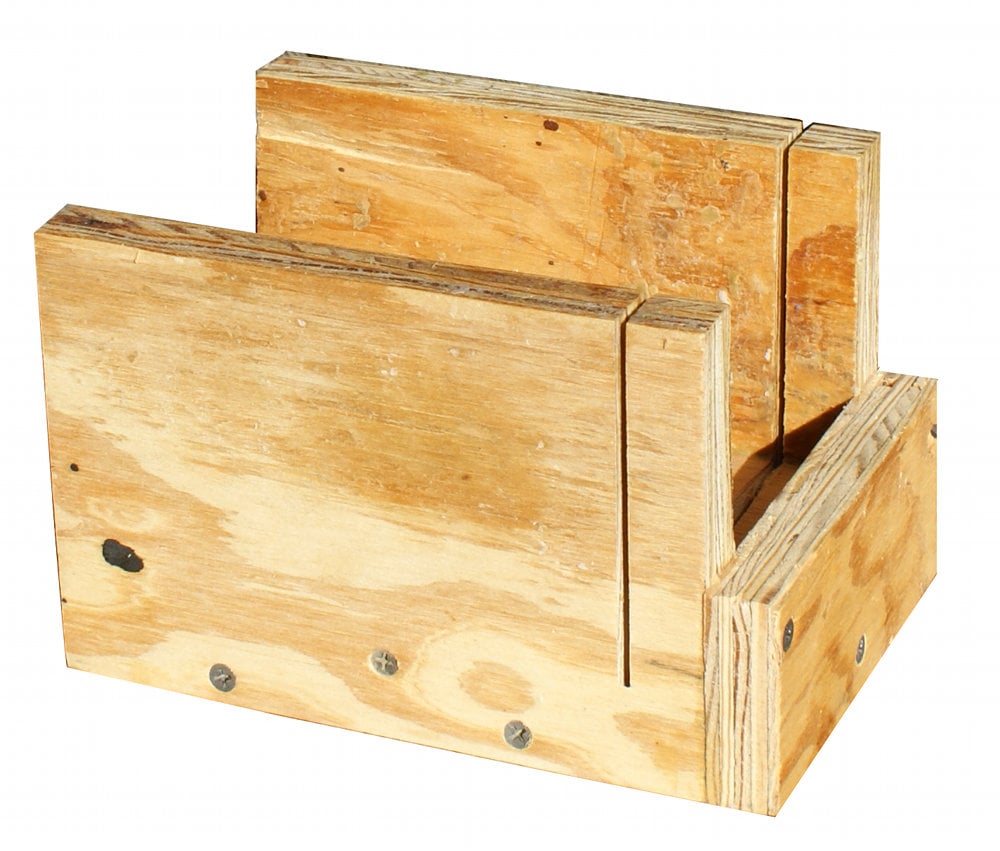
The measurements for this soap cutter are made to pair up with my tutorial on how to make wooden loaf soap molds. It can be used for both melt and pour glycerin soap and homemade cold process soaps. To get started you’ll need either craft wood or plywood that is 3/4″ thick, some screws, wood glue, an electric screwdriver and a saw in order to make your cuts. If you aren’t able to cut your own wood, you may be able to find a friend, neighbor or parent to give you a hand. (My dad made mine for me.) I have also heard that if you purchase wood from Lowe’s that they will cut to your specifications.

The two sides of your soap cutter should be cut to measure 6 1/2″ long by 5″ high. The bottom piece to your soap cutter will need to measure 6 3/4″ long by 3 1/2″ wide. The front stop – which keeps your soap from sliding out to ensure bars are all cut the same size – should measure 5″ long by 2″ high.
Assemble your soap cutter so that the bottom fits in between the two sides. The sides should rest flat on the surface with the bottom in between. Apply wood glue to hold the sides together and clamp until dry. Then put several screw into the side for extra hold. Now glue the front stop to the front of the soap cutter and screw in. Finally, use a saw to cut guides down the two sides and slightly into the bottom piece of wood. These cuts determine the size of your bars. About 3/4″ in make standard size bars in width. Make the cuts further out – 1″ or more – for thicker bars. Make sure the cuts are wide enough that the tool of your choice you’ll be using for cutting will fit into these slits. I use a Chef’s knife to cut my soaps with this soap cutting guide.
Making homemade cold process soap for the first time? Be sure to check out my DIY Soapmaking Tutorial as well as my Beginner Cold Process Soap Recipe.

3 Comments
Joy
August 8, 2014 at 12:05 am
Please help me. I have been making soap for a year now and love it. When I pour it into the loaf mold and in a few days try to cut it I have trouble with breaking and crumbling. At first I thought it was because I whipped it too much with the stick blender and it had too much air in it. The last batch I didn’t whip much at all but still had the same problem. What do I need to do to correct this? Thank you.
Diane
September 21, 2014 at 6:24 pm
I would say you are using too much cocoa butter or hard oils?
I can leave my soap for days and it won’t crumble?
Karen Patrick
August 23, 2014 at 9:49 pm
You are probably waiting too long. I tried to cut my soap 3 days later and it was so crumbly I had to rebatch it. 24hours is the maximum time I have ever left a loaf uncut. You have some really good hard recipes. Cut them, let them air dry and all should be fine. Good luck and hsappy soaping!
Comments are closed.