
What to Expect from a Henna Hair Treatment & Benefits of Henna for Hair
Learn about the amazing benefits of henna for hair and what to expect from a henna hair treatment. Following I share my experience with using henna over the years, plus before and after photos of my own henna hair treatment. You’ll also find in process photos of the subtle changes your hair goes through during the hours following rinsing henna out of your hair!

It’s always a hoot when I share photos of my head in the midst of dying it with henna. It looks kind of crazy. Like seaweed or green mud on my head. The results, however, are totally worth the humiliation of being made a public laughingstock. Not that I really care what I look like with a grocery bag on my head. Otherwise I wouldn’t be here sharing the process with you.
In general, I color my hair with henna at least once a quarter. I always know when it’s time for another round. Not because you see my roots — there are none! But because my hair becomes impossible to deal with. It breaks easily. It’s limp and looks flat. And it completely loses its luster.
I knew my hair was there weeks ago, but I kept putting off taking the time to just some henna on. My solution was to beef up volume by curling it, and add back lost luster with a shine serum.
When I took a selfie after making a DIY hand sanitizer recently, I realized that I couldn’t put it off any longer.
I’m a wash and go kind of girl. I literally air dry my air every single day. In fact, I don’t even own a hair dryer. So by the this time, I was over curling my hair. Without that extra, and exhausting maintenance, my the condition of my hair was super obvious. Especially in the sunlight.
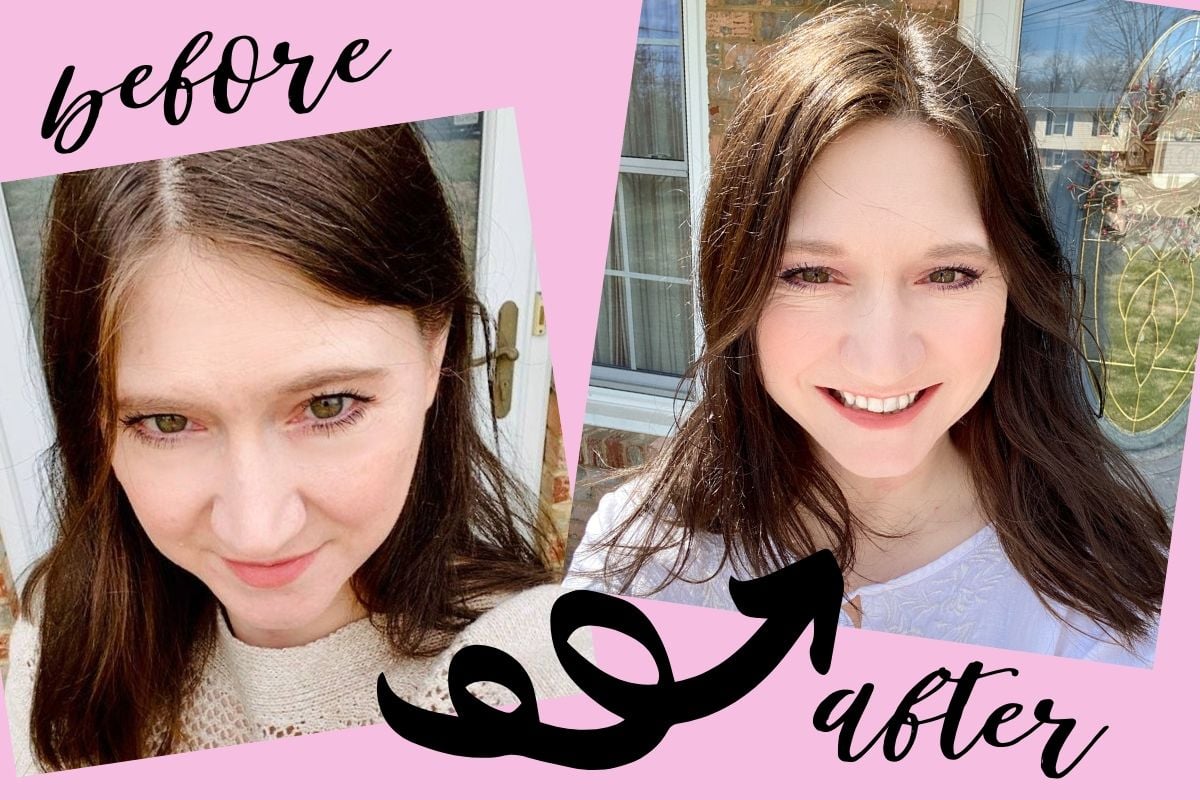
In my before photo, you can see my gray coming in along the side of my face and a few super sparkly, magical grays on tops. My hair is limp AF. I made a sad attempt to get it shiny with some Hask hair oil. It looks almost greasy, which obviously, was not the intended effect.
The after photo is one day after dying my hair with henna. I photographed it in the sunlight as well since sunlight isn’t always kind. The gray is almost completely gone (it disappeared entirely by day two) and my hair is super shiny. I didn’t have to use any hair oil on my hair for the second photo. It also had increased elasticity and air dried perfectly, without any styling.
Keep reading to learn more about the benefits of henna for hair. And see my in progress photos that show you what to expect from a henna hair treatment as it develops!

What is Henna?
Henna is a small flowering shrub, also known as mailanchi. The dried leaves of this plant, when crushed, acts as a natural, non-toxic plant dye that can stain skin and dye hair. When used in for this purpose, dried henna leaves are first crushed into a powder form prior to use. Once mixed with water or tea, henna is able to change the color of skin and hair.
The natural color of true henna is red. However, when mixed other herbs and botanicals, such as cassia, senna or indigo, you are able to change the final color to a variety of shades from strawberry blonde to dark brown or black. Unlike commercial hair dyes, with henna, you don’t have to worry about whether or not the chemicals used my cause cancer later on in life.

Benefits of Henna for Hair
There are a number of benefits of henna for hair. And, as henna is 100% plant based, it’s also considered vegan. So it’s perfect for pretty much everyone!
One of my favorites reasons I love henna for hair is that it works great as a natural remedy for thinning hair on females. At almost 45, my hair is following suit with my mother’s hair at this age — and it’s thinning out more than I’d like. Having had fine hair all my life, it seems even more obvious to me. Regardless, henna seems to put the pep back in its step and gives it not just new life, but a boost of volume as well, as it bonds with and thickens each strand of hair.
I also love that a henna hair treatment is so affordable. In some cases it costs less than store bought hair dye as you don’t need to apply it as often. Plus, you can do it yourself at home and save on that expensive trip to the salon.
Additionally, henna won’t dry out or damage your hair like chemical based hair dyes. So coloring your hair with a henna hair treatment won’t make the condition of your hair worse. Unlike chemical hair dyes, the benefits of henna for hair expands well beyond just a simple color pay off.
You’ll also find that, unlike commercial hair dyes, henna naturally fades out over a three month period. This means there are no obvious roots as hair grows out. So if you don’t have time to do another henna hair treatment as hair grows, root growth won’t be a major concern.
Another one of the benefits of henna for hair is that it naturally strengthens hair. I’ve found that it greatly increases hair’s elasticity. It also gives hair lots of extra shine so it both looks and feels healthy.
If you struggle with dry scalp, dandruff or have an itchy scalp, a henna hair treatment may help. In addition, it also promotes hair growth and can reduce daily hair fall out.
Henna doesn’t care what type of hair you have. What makes it so amazing is that it works for every hair type. It can even cover gray hair, using a two-step process.
Finally, you can customize the final color of your henna hair treatment by adding herbs and botanicals. You can learn how to cover gray and create custom henna hair colors here.

What to Expect from a Henna Hair Treatment
Henna powder, when mixed with water, is kind of like mud. You don’t want it too thin or it will drip for days. Too thick, and it’s harder to wash out.
It can also react with chemicals found in tap water as well as metals, so be sure to use filtered or distilled when to mix with henna. And always heat your water and mix your henna in a non- metal container. Basically you want to mix your henna to about the consistency of yogurt, until it’s smooth and creamy. If you buy a henna hair treatment kit, it should come with mixing directions to help guide you.
You’ll want to start by applying henna to your roots first, and work in sections. (Just make sure it’s cooled down enough that it won’t burn your scalp when applied!) There are tons of videos on YouTube on the correct way to apply henna. But to be honest, I don’t have that much patience.
I start at the crown of my head and then slather it on, pulling up more hair as I go. It’s not perfect. What’s important, however, is that it still works. As long as you ensure you’ve covered every strand of hair, you’ll be fine. Your hair is still going to reap all the benefits of henna for hair. You don’t need to have someone professionally apply your henna. You don’t have to use a brush. And you don’t need a friend to help. Trust me. You’ve totally got this.
The process, obviously, can be a bit messy. Just wear an old t-shirt when you apply your henna hair treatment. It washes out, so don’t worry about towels getting stained. While lighter colored fabrics may initially stain, it’s only temporary. However, I do advise cleaning up spills on floors and counters within a reasonable period of time.
To experience the full benefits of henna for hair, the dying process can take anywhere from 2 to 6 hours. In general, I leave henna on my hair, covered, for about 1 1/2 to 2 hours depending on how long it’s been since my last use. If you are using henna specifically to color your hair, the best way to determine the length of time needed for coverage is a hair strand test. However, if after three days, the color or coverage isn’t what you expected, you can simply repeat the process.
It can take a hot minute to rinse henna back out of your hair, and it’s a messy process. So I always just hop into the shower for the chore. I rinse my hair really well with water, then use conditioner to remove any remaining bits. (For best results, you should wait at least 24 hours after rinsing henna out of your hair to shampoo.)
Afterwards, my hair straight up smells like spinach for several days. I’ve noticed the same scent with other botanical dyes and conditions such a senna.
It’s really cool to watch your hair change though. As henna can take up to 72 hours to fully oxidize and develop, you’ll notice subtle changes over this time period.

Pictured above is a photo of the changes my hair went through after rinsing this medium brown henna out of my hair. In the first photo you’ll see that the gray streak on the side is still super obvious. You can also see gray salt and peppered throughout. In the second photo, the color is a bit more even, with that glorious (what I call my blonde gray) streak less obvious. And, in the final photo, just a few hours later, you can see that my hair is darker overall, with more even coloring over my entire head.

My after photo, as previously indicated, is from day two. It’s a big difference from where I started. By the third day, all signs of gray had disappeared entirely and my hair was slightly darker.
It’s now been a week and my hair is super shiny and manageable, with increased body and volume. And it cost me less than $10!
Ready to apply a henna hair treatment to your hair to enjoy the benefits of dying your hair with henna? Discover basic information on how to use henna here.
For more detailed information on coloring your hair with henna, the ebook, Coloring Hair Naturally with Henna & Other Herbs: A Guide, is a great resource. It provides all the information you need to get the full benefits of henna for hair when using a henna hair treatment. And, it will teach you how to custom blend your own natural dyes as well as confidently select the best ingredients. Learn more here.

Love this natural beauty tip about the benefits of henna for hair? Then be sure to pin this post to Pinterest for later. (You can also follow me for more additional ideas.) Or, discover even more natural beauty recipes by following me across your favorite social media platforms! You can find me on Facebook, Twitter and Instagram.
9 Comments
Christie
April 28, 2020 at 3:52 pm
This is such an amazing and natural way to treat your hair! Thanks for sharing.
Irena
April 28, 2020 at 11:13 pm
Thank you for sharing so many useful tips! It’s great to have an option to colour hair naturally!
Cari
April 29, 2020 at 2:22 pm
I’ve never used henna, but now I’m intrigued! Your hair looks awesome!
Rebecca D. Dillon
April 29, 2020 at 2:30 pm
Thanks so much!
Kyla
May 5, 2020 at 12:06 pm
Your hair looks amazing and so healthy! I used henna for many years and loved the way my hair felt.
Khaye Villanueva
May 27, 2021 at 7:34 am
Hi, I like how the color turned out on your hair. May I ask which brand you used and color shade?:)
Thank you 🙂
Rebecca D. Dillon
May 27, 2021 at 5:31 pm
Sure. It’s Light Mountain Natural Hair Color & Conditioner in Medium Brown.
Yvonne
January 18, 2022 at 1:11 pm
How long between when you actually dyed your hair with commercial hair dye di you wait before using Henna?
Did you have any chemical reaction at all? I have been dying my hair for many many years and would like to use a more natural way to cover my greys. I color about every 2 1/2 months.
thank you for a very timely post.
Have a lovely safe day
Yvonne
Rebecca D. Dillon
January 19, 2022 at 12:03 pm
You need to grow your hair out completely and remove any portion of your hair that’s been dyed using non-plant based dyes.
Comments are closed.