Mason Jar Night Light: DIY Unicorn Night Light for Unicorn Lovers
Mason jar night lights are an easy way to add conversation worthy home decor to any room on a budget. This tutorial shows you how to make a DIY mason jar night light for kids decorated with a unicorn and rainbow that’s perfect for a little girl’s room. You can also make this easy night light DIY to add a whimsical touch to your favorite reading nook! Keep reading to learn how to craft your own mason jar night light via my step-by-step instructions and a comprehensive video tutorial.
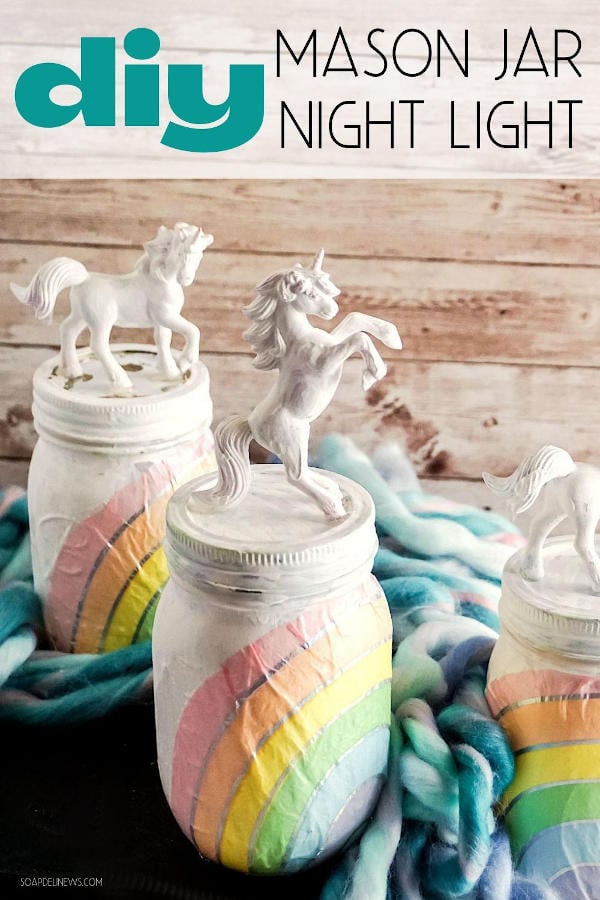
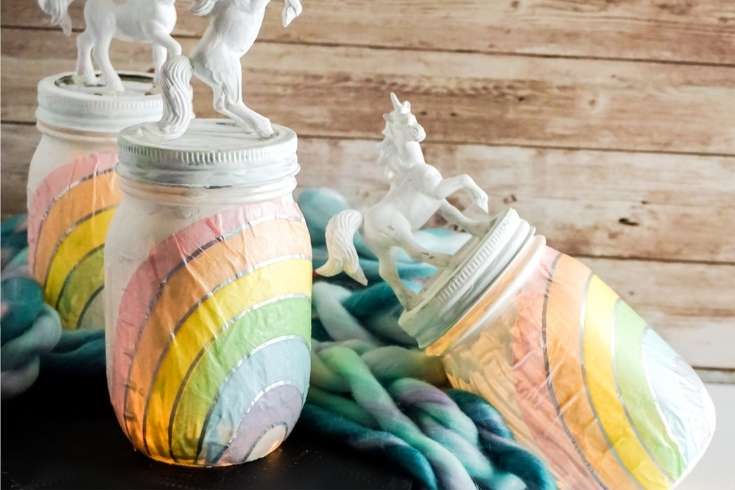
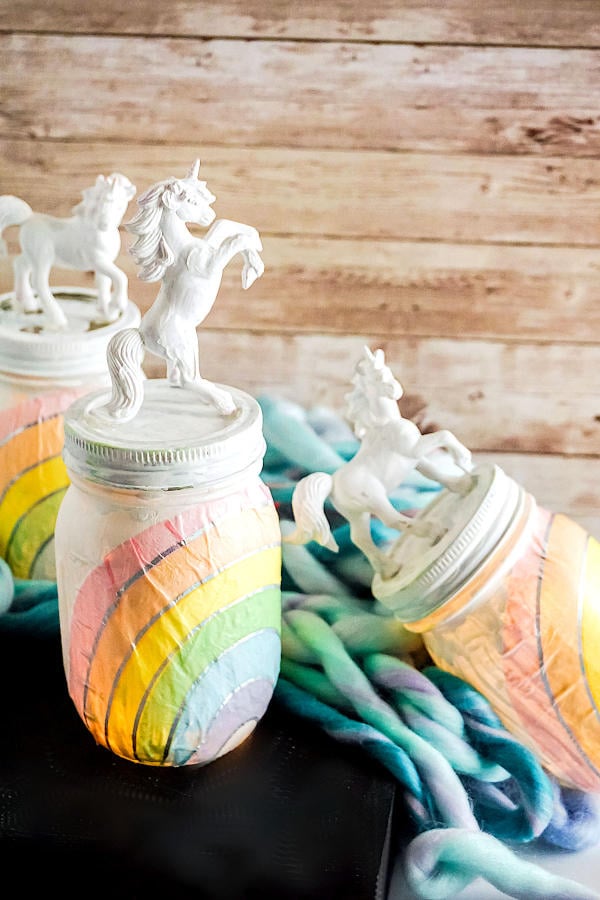
It’s easy and fun to craft a DIY mason jar night light! Created using rainbow napkins and unicorn toys, these timeless elements add a touch of whimsy to any mason jar to create a functional night light that also doubles as home decor. These unicorn night lights are also user-friendly too! So the kids can turn these lights on and off as needed.
If you’re ready to make a colorful rainbow and unicorn mason jar night light for a room in your home, grab a paintbrush and let’s get crafting!
Rainbow & Unicorn Inspiration for Mason Jar Night Lights
One of the things that inspired this fun mason jar night light craft was the napkin. I’m always browsing (drooling over) party supplies online. I have a long love of paper products. Not just paper party straws and decor, but stationary and stickers too! While perusing a collection of unicorn party supplies just as a one-off, I found these absolutely beautiful rainbow napkins.
There was just something about really pretty about these rainbow napkins. Not only do they have a unicorn worthy, holographic iridescent shimmer, the pastel colors were just perfect for a totally girly project. As soon as I saw these napkins I knew exactly what I wanted to make with them.
I just started off with the idea of making a rainbow night light from my stock of mason jars. But I found the unicorn figurines online right around the same time and I couldn’t help myself. These two elements just NEEDED to go together.

The result? A unique DIY home decor piece for my favorite space. These also make a great gift for a unicorn birthday party for a daughter or granddaughter. Or, if you’re friends or like my friends and they’ve never grown up, gift them to your BFFs!
This isn’t just a great adult craft project for a women’s craft night, however. Older kids and teens can also easily tackle make their own unicorn night lights. They’ll, of course, expand on our own creativity by adding their own personalized touches. (I’m envisioning holographic glitter and star stickers for days.) Kids can also make and gift these unicorn mason jar night lights to their friends. (Some children may need help with the hot glue, so be sure to monitor your child’s activity if they decide to take on the challenge.)
Alternately, if you make this project using a dishwasher safe Mod Podge and use a mason jar drinking lid, you have a fun seasonal drinking glass. (Just skip adding the fairy lights inside!) This also makes a wonderful make and take craft project for a teen girl’s birthday party.

How to Make a Decoupage Mason Jar Night Light
Materials & Supplies:
3 Smooth Walled Mason Jars with Lids
3 Iridescent Rainbow Napkins
3 3-Inch Unicorn Figurines
White Acrylic Paint
Matte Mod Podge Waterbase Sealer
3 Sets Fairy Lights
Tools:
Paintbrush
Hot Glue Gun & Glue
Scissors

Instructions for Making Mason Jar Night Lights:
Start by cleaning and drying three mason jars. Once the mason jars are completely dry, paint each lid and jar white. Allow paint to dry completely.

While the paint dries on the mason jars, paint three of the unicorn figurines white. Then, allow the paint to dry completely.
In the meantime, cut out the iridescent ply side of three napkins. Discard the remainder.

Once the paint on both the mason jars and the unicorns has fully dried, you’re ready to decoupage the rainbow napkins onto the face of your jars.
To do, this place a thin layer of matte Mod Podge to the face of a jar using a paint brush.
Position one iridescent ply side of the napkin face-up on the Mod Podge. Use a thin layer of the Mod Podge on top of the napkin to help reduce wrinkles in the napkin, as the sealant is being spread. I found the most success in placing the center of the rainbow first, then working out to the edges. Allow the glue to dry completely.

Once the glue has dried on the mason jar, use a hot glue gun to glue a unicorn onto the lid of each mason jar.

Finally, place a set of fairy lights inside each of your unicorn mason jar night lights.
Your DIY mason jar night lights are now ready to decorate your home or give as homemade gifts.
Unicorn Mason Jar Night Light

Mason jar night lights are an easy way to add conversation worthy home decor to any room on a budget. This tutorial shows you how to make a DIY mason jar night light decorated with a unicorn and rainbow that’s perfect for a little girl’s room.
Materials
- 3 Smooth Walled Mason Jars with Lids
- 3 Iridescent Rainbow Napkins
- 3 3-Inch Unicorn Figurines
- White Acrylic Paint
- Matte Mod Podge Waterbase Sealer
- 3 Sets Fairy Lights
Tools
- Paintbrush
- Hot Glue Gun & Glue
- Scissors
Instructions
- Clean and dry your mason jars completely, then paint each one white, including the lid. Allow paint to dry completely.
- Paint each of the unicorns white. Allow the paint to dry completely.
- Cut out the iridescent ply side of three napkins. Discard the rest.
- Place a thin layer of craft sealant to the face of a jar.
- Position one iridescent ply side of the napkin face-up on the Mod Podge. Use a thin layer of Mod Podge on top of the napkin to help reduce wrinkles in the napkin, as the glue is being spread. Allow the Mod Podge to dry completely.
- Hot glue a unicorn on the lid of each jar.7. Place a set of fairy lights inside each jar.
Love my unicorn mason jar night light DIY? You can discover more fun DIY craft projects here to make and gift or to use to decorate your home. For more crafts and DIY ideass, follow me on all your favorite social media platforms. You can find me on facebook, twitter and instagram as well as on Pinterest.