Dead Sea Mud Soap Recipe with Tea Tree (Easy Melt and Pour Soap DIY)
This DIY tea tree and sea mud soap is a creative way to explore melt and pour soap crafting. Not all soap DIY’s are as easy as they seem. Especially when formulating a new recipe. This melt and pour soap recipe started as a mishap, but turned into a beautiful marbled soap in the end! Check out the before and after photos of this melt and pour soap project. Then discover how to recreate the easy melt and pour soap recipe for beginners that I ended up with!

DIY Sea Mud Soap with Tea Tree Oil
As a crafter and soapmaker, there are absolutely those days when an idea for a soap recipe you have in your head, does not execute the way you thought it would. This was one of those projects. However, with a little creativity, I was able to turn a soap fail into a soapmaking success! Learn how I turned my soap fail around and find out how to make melt and pour tea tree and sea mud soaps!
Formulating a Melt and Pour Soap Recipe
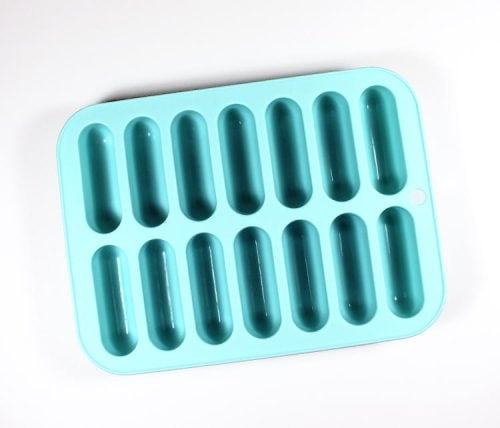
I knew I wanted to make a melt and pour tea tree and sea mud soap recipe. And I also wanted to try out a silicone mold that I’d purchased at Target. The plan was to have “strips” of sea mud in the melt and pour soaps.
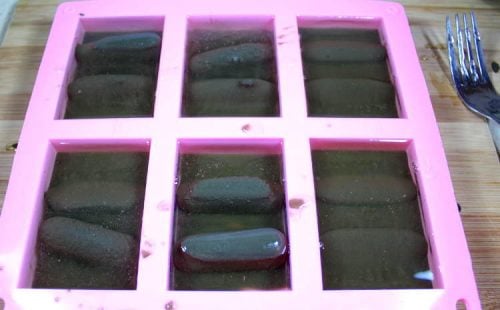
Unfortunately, I did not account for the sea mud soap embeds separating into the melted glycerin soap I poured around them in the mold. So essentially, I ended up with soap that, as it was cooling, looked like poop separating in a toilet bowl.


Nor were the finished melt and pour soaps very attractive either.
How to Fix a Melt and Pour Soap Fail
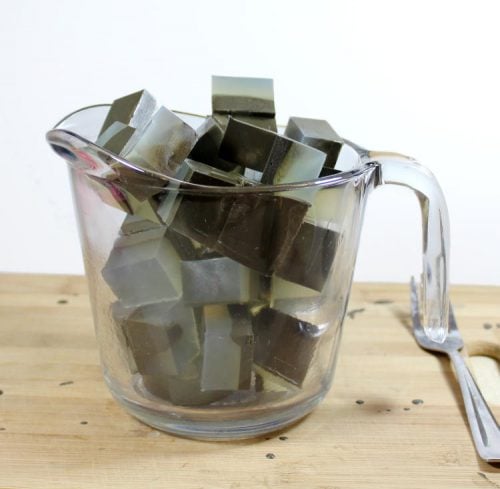
As I was using melt and pour soap, I simply cut the soaps into chunks and reheated them in the microwave.

Then I poured the melted soap into my molds again. This time, however, I did not fill the mold cavities up completely. Once there was a “skin” on the surface of the soap I was ready to add my fix.
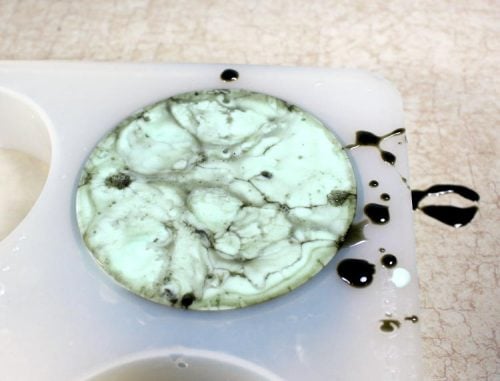
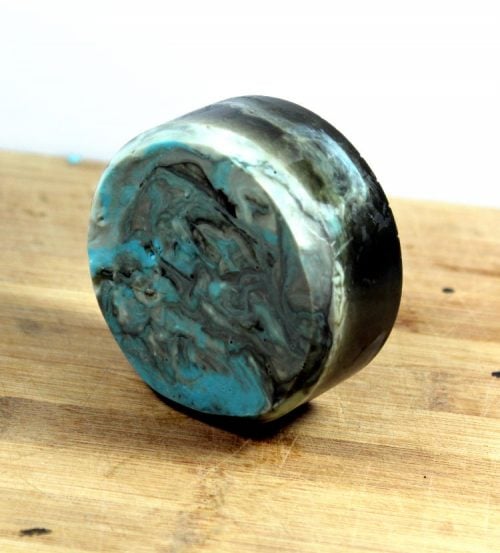
I then melted a white melt and pour soap base and added a forest green liquid soap colorant to it. I poured some of this new soap on top of the soap mixed with sea mud in the molds. I used a utensil to “lift” some of the sea mud soap from the bottom of the mold and mixed it into the top. I then place the soap in the fridge to cool further.
Next, I added turquoise mica to the rest of the melted soap base I previously added the forest green liquid soap colorant to and mixed it in. I allowed it to cool just to the point before it hardened, but I was still able to pour it.
I then poured the turquoise colored soap on top of the soap in the fridge and again used a utensil to pull more of the sea mud soap to the top so it all swirled together. Then I waited.


Once my soaps had hardened completely, I removed them from the refrigerator.
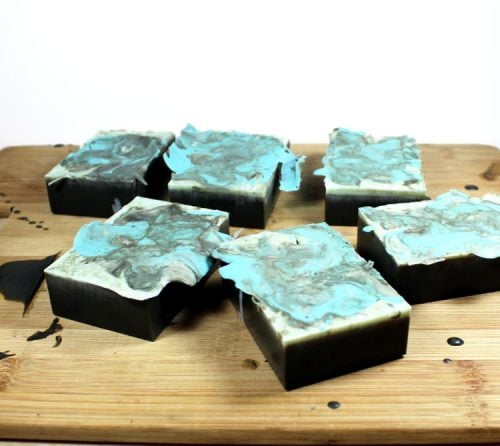
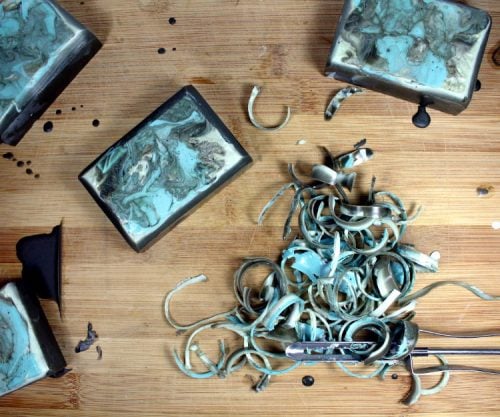
I then removed the individual soaps from my silicone mold cavities and used a knife to trim off the excess around the top from my pours.
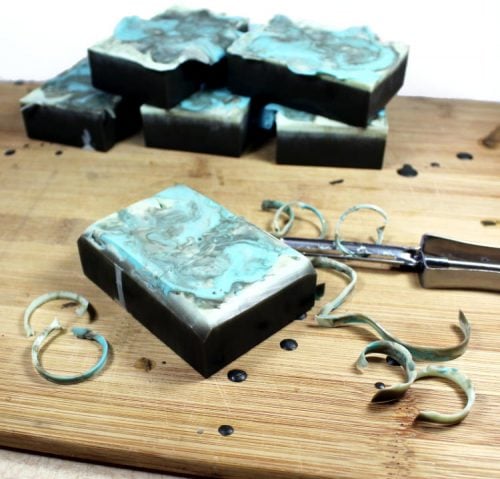

I then used a potato peeler to bevel the edges of the soaps.
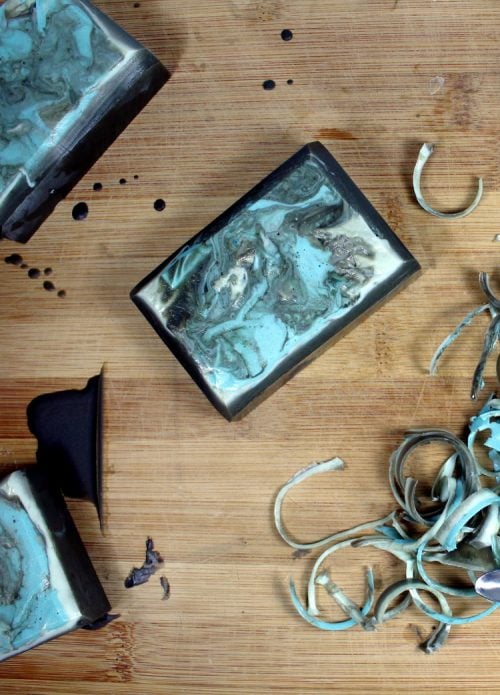
Then all that was left to do was to wrap my completed tea tree and sea mud soaps in foodservice film!
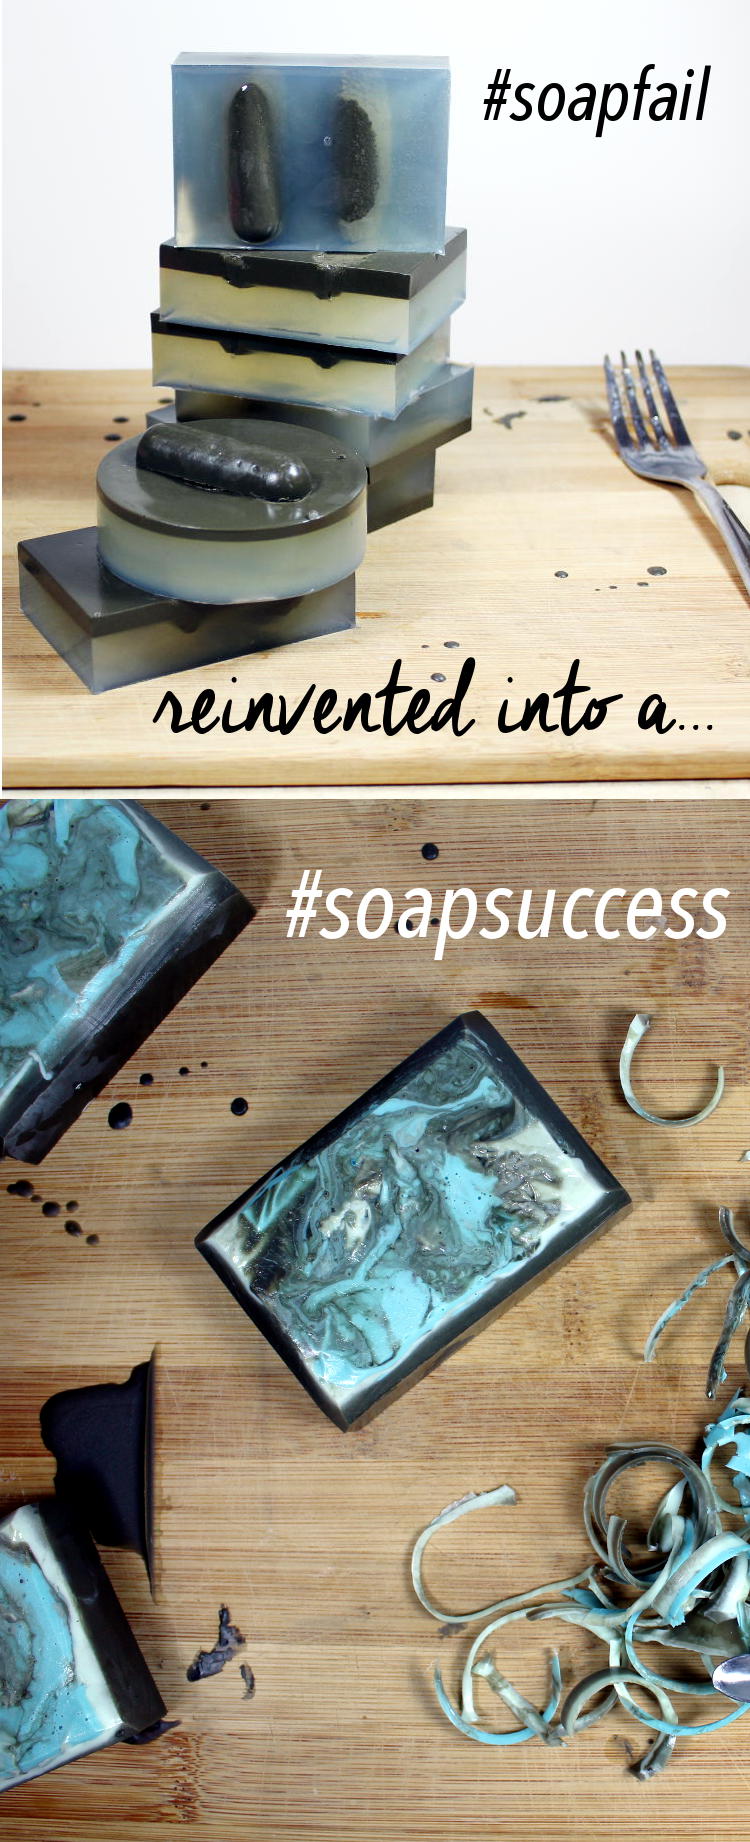
And my soap fail became and instant soap success!
To make your own tea tree and sea mud soap, simply follow my revised tea tree and sea mud soap recipe below. But first, let’s explore the benefits of using a sea mud soap in your skin care routine.
Dead Sea Mud Soap Benefits
Sea mud is good for a number of common skin conditions. Natural Dead Sea clay is often used in cosmetic applications to detox and purify skin as well as to help with acne. Following are some of the sea mud soap benefits you’ll experience when using this soap:
- Sea mud helps improve skin elasticity.
- It’s naturally rich in magnesium and salt that aid in skin’s functionality.
- This clay helps to soothe itching and skin irritation.
- It’s shown that soap made with sea mud benefits skin by helping reduce symptoms caused by dry skin and eczema.
- Sea clay soap is excellent for acne prone skin as it aids in drawing out oil and toxins that can clog pores.
- Tea tree soap made using sea mud can help to temporarily shrink pores as well as well as reduce the appearance of fine lines and wrinkles by smoothing skin.
- The minerals present in sea mud promote healing.
Dead Sea Mud Soap Recipe
© Rebecca D. Dillon
Tea tree oil and sea mud are wonderful ingredients for natural skin skin. Learn how to incorporate these two products into a melt and pour soap base to create a stunning marbled soap for your daily beauty regimen. This easy melt and pour soap recipe with essential oils makes beautiful homemade gifts. Or use it as part of your daily skin care routine on your face and body to cleanse skin and help prevent acne.
Tea Tree and Sea Mud Soap Ingredients:
These are the ingredients you will need to make this melt and pour soap recipe with sea mud and a lavender and tea tree essential oil blend:
- 22 oz. aloe vera & olive oil glycerin melt and pour soap base: This clear melt and pour soap base is made using natural aloe vera and olive so it nourishes and hydrates dry skin. As some soap bases tend to be drying, it’s important to start with a detergent free base that contains the ingredients you’re looking for from the start.
- 4.2 oz. basic white melt and pour soap base: A second opaque melt and pour soap base helps give this sea mud soap with tea tree oil its decorative appearance.
- 3.75 oz. dry Dead Sea clay: Sea mud, or sea clay, has anti-inflammatory properties when used in skin care. This soothing clay contains naturally occurring sulphur that can help to treat acne symptoms and prevent breakouts. You will need to use dry sea clay for this recipe that is in its powdered clay form rather than sea mud that has been reconstituted with water.
- 1.2 oz. tea tree oil: Prized for its ability to promote healing, this essential oil also helps to soothe and calm irritated skin. A powerful, all natural antioxidant, tea tree essential oil works great as an antiseptic for acne prone skin. It is also both antibacterial and antifungal making it popular choice for facial soaps and body care where acne is a concern.
- .1 oz. lavender essential oil: Lavender’s ability to promote healing, especially where burns are concerned, is unsurpassed. Not only does it assist in detoxing skin, but it also has anti-inflammatory, antifungal, and antimicrobial properties when used in skin care. This gentle essential oil also calms redness and skin irritation and rashes and is great for dry skin and eczema.
- Forest green liquid soap colorant (to suit): A green liquid soap colorant is used to give this tea tree soap with sea clay its decorative marbled top.
- Turquoise mica (to suit): Turquoise mica powder is also incorporated into this decorative, marbled melt and pour soap to add a fun pop of color.
Tools and Equipment
Following are the tools and equipment needed to recreate this DIY sea clay soap:
- Digital Kitchen Scale: You will use a digital scale to weigh out the ingredients called for in this sea clay soap recipe.
- Silicone Soap Mold: A 6-Cavity Silicone Soap Mold is necessary to mold the melt and pour soap into bars.
- Cutting Board: This common kitchen tool is used to transport the soap mold to another location, such as the refrigerator, after the melted soap base has been poured into the soap making mold.
- Heat Safe Containers: You will need heat safe containers, such as glass Pyrex measuring cups to mix and melt the glycerin soap base use to make this sea mud soap recipe.
- Microwave: A microwave is used to melt the soap base in order to form decorative soap bars.
- Fork: You will use a fork to mix the melted soap base as well as to create the decorative marbled stone pattern on top of the soap bars.
How to Make Dead Sea Mud Soap
Here is how to make Dead Sea mud soap for skin care:
1. Using a digital scale, weigh out 22 oz. of the aloe vera and olive oil melt and pour soap base. Cut into chunks, then heat in the microwave in 30 second increments. Stir in between heatings until the soap has melted fully.
2. Now weigh out the sea mud and stir into the melted soap base. Do the same with the essential oils.
3. Place your 6-Cavity Silicone Soap Mold onto a cutting board.
4. Now pour the melted soap evenly into each of the cavities leaving space on top to add the colored soap.
5. Once a “skin” forms on the top of the soap you are ready for your next soap.
6. Now weigh out 4.2 oz. of the basic white soap base. Cut it into chunks and heat in the microwave, in 30 second increments, until melted.
7. Add the forest green soap soap colorant to the melted soap, a drop at a time, until you reach the desired color.
8. Now pour part of the green tinted soap base on top of the soap mixed with sea mud in the molds. Use a fork or chopstick to “lift” some of the sea mud soap from the bottom of the mold and mix it into the top.
9. Using the cutting board for support, transfer the soap into your refrigerator to cool further.
10. Now add turquoise mica to the green tinted soap to suit and mix well. Once it starts to set up, but is still pourable, pour the turquoise colored soap on top of the soap in the fridge. Use a fork or chopstick to pull more of the sea mud soap from the bottom of the mold cavities to the top and swirl it slightly until you’ve achieved your desired effect.
11. Once your tea tree and sea mud soaps have solidified, remove them from the mold cavities, trim the edges, then wrap tightly in foodservice film until use.
If you like my Dead Sea mud melt and pour soap recipe, then also be sure to try my cold process sea mud soap recipe.
Want more fun and easy melt and pour soap recipes? Then be sure follow me on Pinterest for more great skin care DIY’s and soap crafting projects. You can also find and follow Soap Deli News on Facebook, Twitter, Blog Lovin’, and Instagram.